
Every business that pays contractors $600 or more annually must file 1099 forms by January 31st. Missing this IRS deadline results in penalties starting at $50 per form.
QuickBooks Online makes the process straightforward when you know the right steps. We at Optimum Results Business Solutions will walk you through how to QuickBooks Online generate 1099 forms efficiently and accurately.
How Do You Set Up Vendors for 1099 Compliance
QuickBooks Online requires specific vendor information before it generates 1099 forms. Navigate to the Vendors tab and select New Vendor for each contractor. Input their complete legal business name exactly as it appears on their W-9 form. The Tax ID field accepts both Social Security Numbers for individuals and Employer Identification Numbers for businesses. QuickBooks automatically validates these numbers against IRS format requirements. Track vendors throughout the year when you enable 1099 tracking in their vendor profile under the Tax Info section. Select Track payments for 1099 and choose the appropriate form type – typically 1099-NEC for contractor services or 1099-MISC for rent and other payments.
Payment Categories That Matter
Payment categories determine which 1099 box reports your payments. Services that independent contractors perform belong in the Professional Services expense category, which maps to Box 1 on Form 1099-NEC. Rent payments to individuals or unincorporated entities go to Rent expense and appear in Box 1 of Form 1099-MISC. QuickBooks excludes payments made via credit card, debit card, or third-party processors like PayPal since these generate separate 1099-K forms.
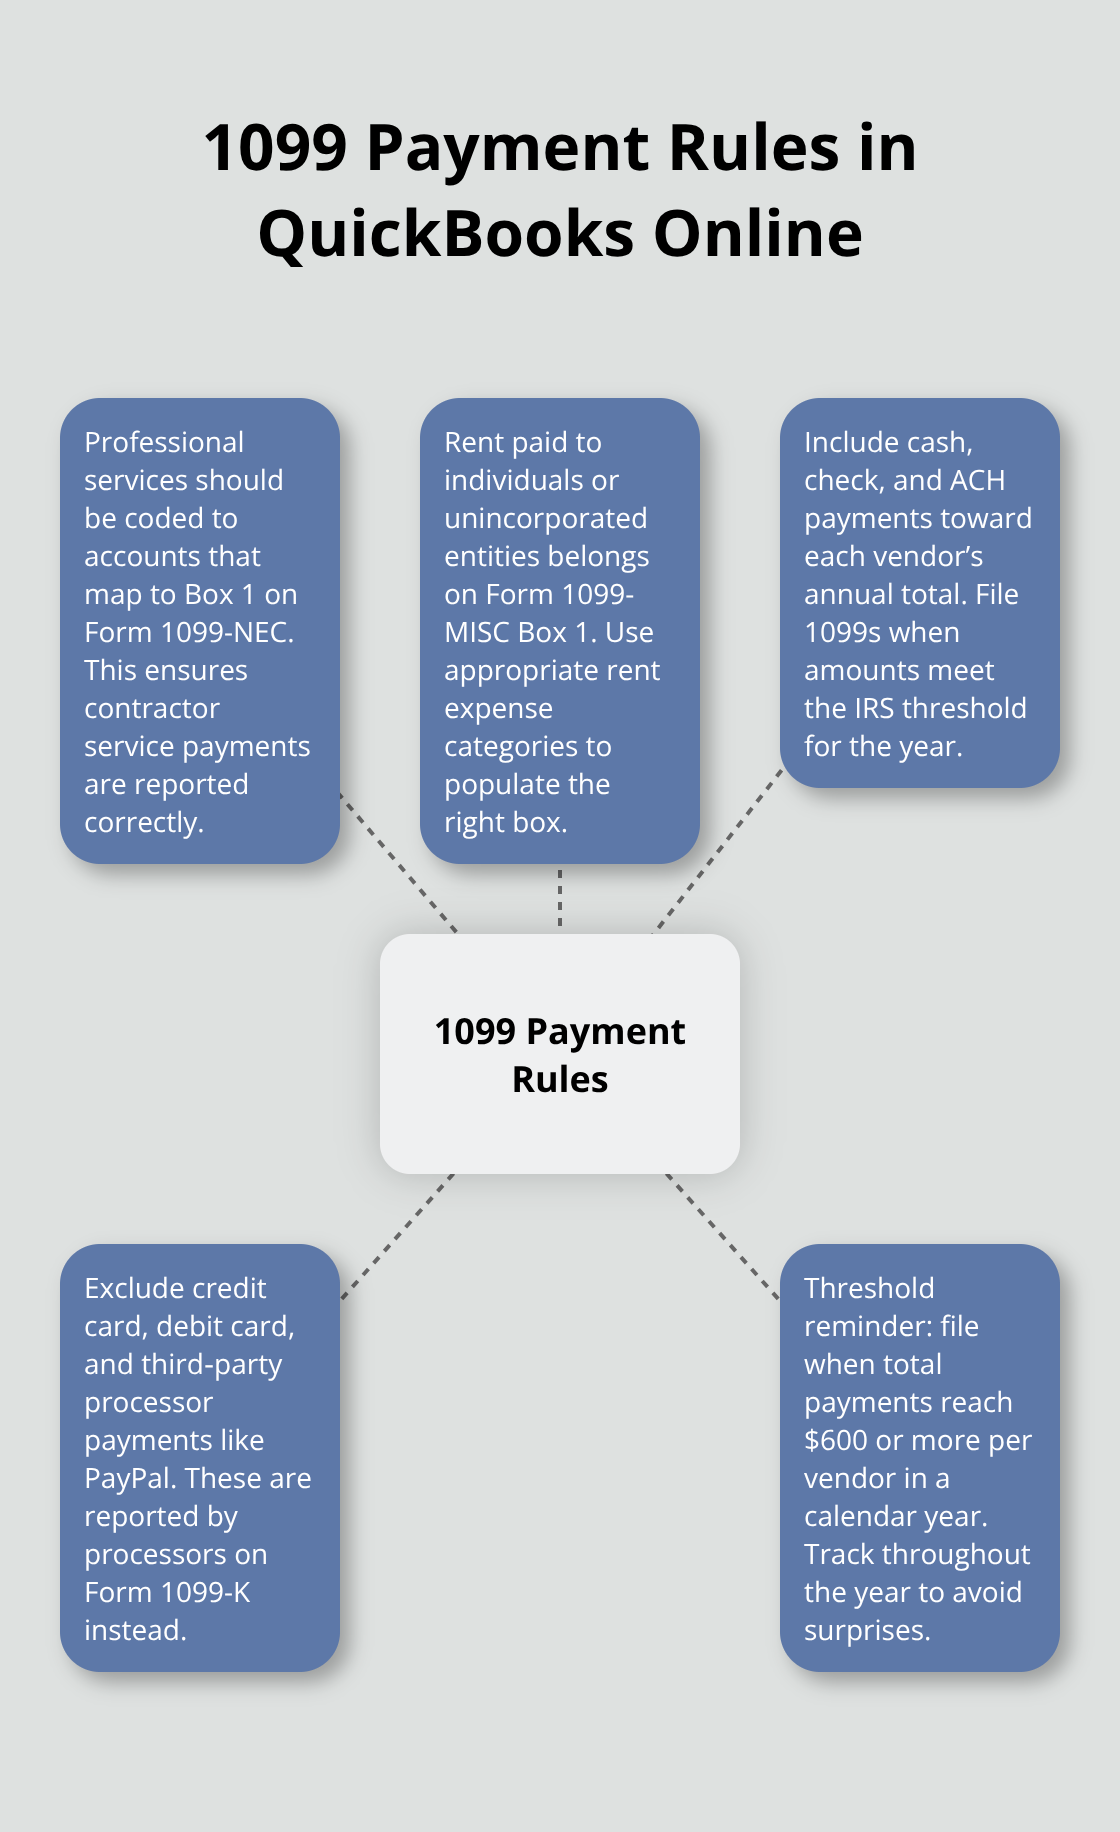
Cash, check, and ACH payments require 1099 reports when they total $600 or more annually per vendor.
Update Vendor Records Before Year-End
Review existing vendor profiles before year-end to capture Tax IDs that you missed. Access each vendor record and verify the address matches their current location. QuickBooks flags vendors with warning indicators in the 1099 preparation screen when they miss required information. Update payment categories for any transactions that you coded incorrectly during the year. The system applies category changes retroactively to all historical transactions for that vendor and automatically recalculates 1099 totals.
Once you complete your vendor setup and verify all information accuracy, you can move forward to prepare and review your 1099 data for final submission.
How Do You Review 1099 Data for Accuracy
Access the 1099 preparation report through Taxes > Payroll Tax > Annual Forms > 1099s in QuickBooks Online. This report displays all vendors who received payments that total $600 or more during the tax year. The system calculates payment totals automatically based on expense categories you assigned throughout the year. QuickBooks flags vendors who lack Tax ID numbers with red warning indicators that prevent form generation. Address these immediately since the IRS rejects incomplete submissions. The report shows payment breakdowns by form type – 1099-NEC for contractor services and 1099-MISC for rent, royalties, and other income categories. Review each vendor’s payment total against your records to catch any discrepancies before you file.
Fix Payment Classification Errors
Payment misclassification creates the most common 1099 errors that trigger IRS penalties. Navigate to each transaction through the vendor’s profile and verify expense categories match IRS requirements. Professional services must use expense accounts that map to Box 1 on Form 1099-NEC, while rent payments require categories that populate Box 1 on Form 1099-MISC. QuickBooks excludes credit card and electronic payments automatically, but manual review catches edge cases where you miscoded cash payments as electronic transactions. Reclassify any payments that appear in wrong categories since these errors compound across multiple vendors and inflate penalty risks.
Validate Vendor Information Completeness
Incomplete or incorrect vendor details stop the process entirely. The 1099 preparation screen highlights vendors who lack complete addresses, Tax IDs, or business names. Contact vendors immediately to obtain W-9 forms since January deadlines leave no room for delays (the IRS requires forms by January 31st). Verify business names match exactly with Tax ID records to prevent IRS rejection notices. Update vendor profiles with corrected information and regenerate the preparation report to confirm all warnings disappear. QuickBooks validates Tax ID formats automatically but cannot verify accuracy against IRS databases, which makes vendor communication essential for compliance.
Reconcile Payment Totals
Compare QuickBooks payment totals with your bank statements and check registers to identify discrepancies. The system includes all cash, check, and ACH payments but excludes credit card transactions (these appear on separate 1099-K forms from payment processors if payments total over $5,000). Look for duplicate entries or missed payments that could affect vendor totals. Adjust any incorrect amounts through journal entries or by editing the original transactions. This verification step prevents under-reporting or over-reporting vendor payments to the IRS.
With your 1099 data verified and all vendor information complete, you can proceed to generate and file the actual forms through QuickBooks Online.
How Do You Generate and File 1099 Forms
Navigate to Taxes > Payroll Tax > Annual Forms > 1099s in QuickBooks Online to access the form creation interface. Click Prepare 1099s to start the process. The system displays all vendors who received payments that total $600 or more during the tax year. Select each vendor you need to file for and verify their payment amounts appear correctly. QuickBooks automatically assigns Form 1099-NEC for contractor services and Form 1099-MISC for rent and royalty payments based on the expense categories you used throughout the year. The platform validates all required fields (Tax IDs, addresses, and payment classifications) before it allows form creation. Complete forms populate automatically with your business information from your company profile.
Electronic Filing Saves Time and Money
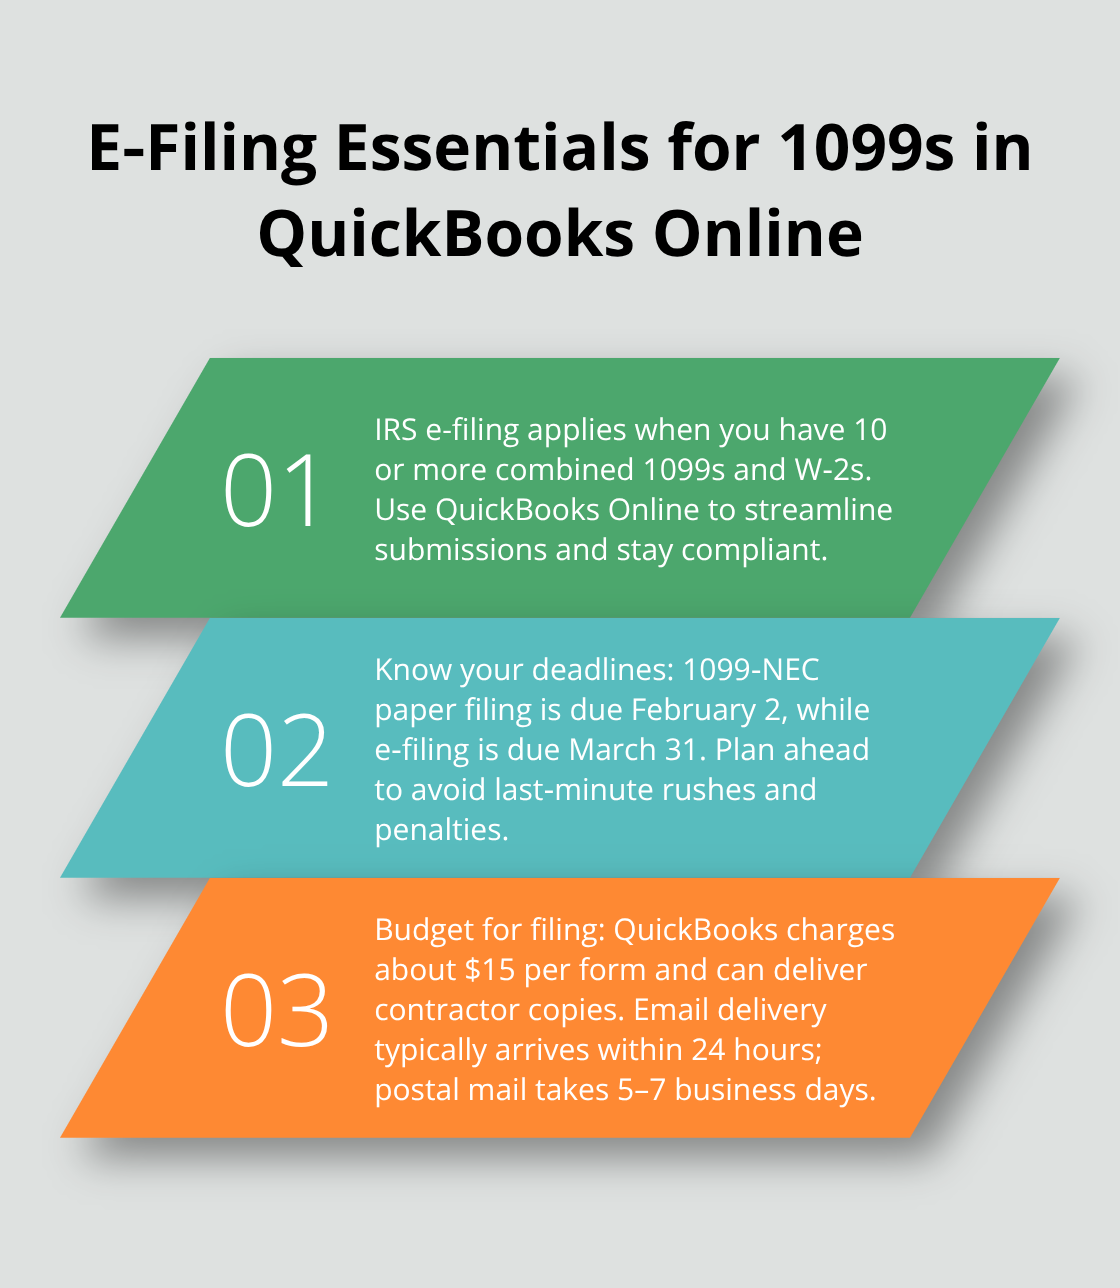
Electronic filing through QuickBooks Online requires 10 or more 1099s and W-2s combined according to IRS regulations. Form 1099-NEC must be filed by February 2 for paper filing, or March 31 if e-filing. QuickBooks charges approximately $15 per form for electronic filing services, which includes automatic distribution to contractors via email or postal mail. Select your preferred delivery method during the filing process – email delivery reaches contractors within 24 hours while postal delivery takes 5-7 business days.
The system sends confirmation notifications once the IRS accepts your submissions and provides downloadable copies for your records.
Print Forms When Electronic Filing Is Not Required
Businesses that file fewer than 10 forms must print and mail paper copies to the IRS and contractors. Purchase official 1099 forms from office supply stores or order them directly from the IRS by mid-January to meet deadlines. QuickBooks creates PDF versions of completed forms that you can print on official red-ink forms. Set your printer to actual size (100%) and use the manual feed tray to prevent alignment issues that cause IRS rejections. Mail contractor copies by January 31st with certified mail to establish proof of delivery.
Submit Forms to the IRS
Submit Copy A to the IRS along with Form 1096 which summarizes all 1099 forms you filed. Keep Copy C for your business records and provide Copy B to each contractor. The IRS processes electronic submissions faster than paper forms and sends confirmation notices within 2-3 weeks. Paper submissions can take 6-8 weeks for processing confirmation. Track your submission status through the QuickBooks filing dashboard to monitor IRS acceptance and identify any rejection notices that require corrections.
Final Thoughts
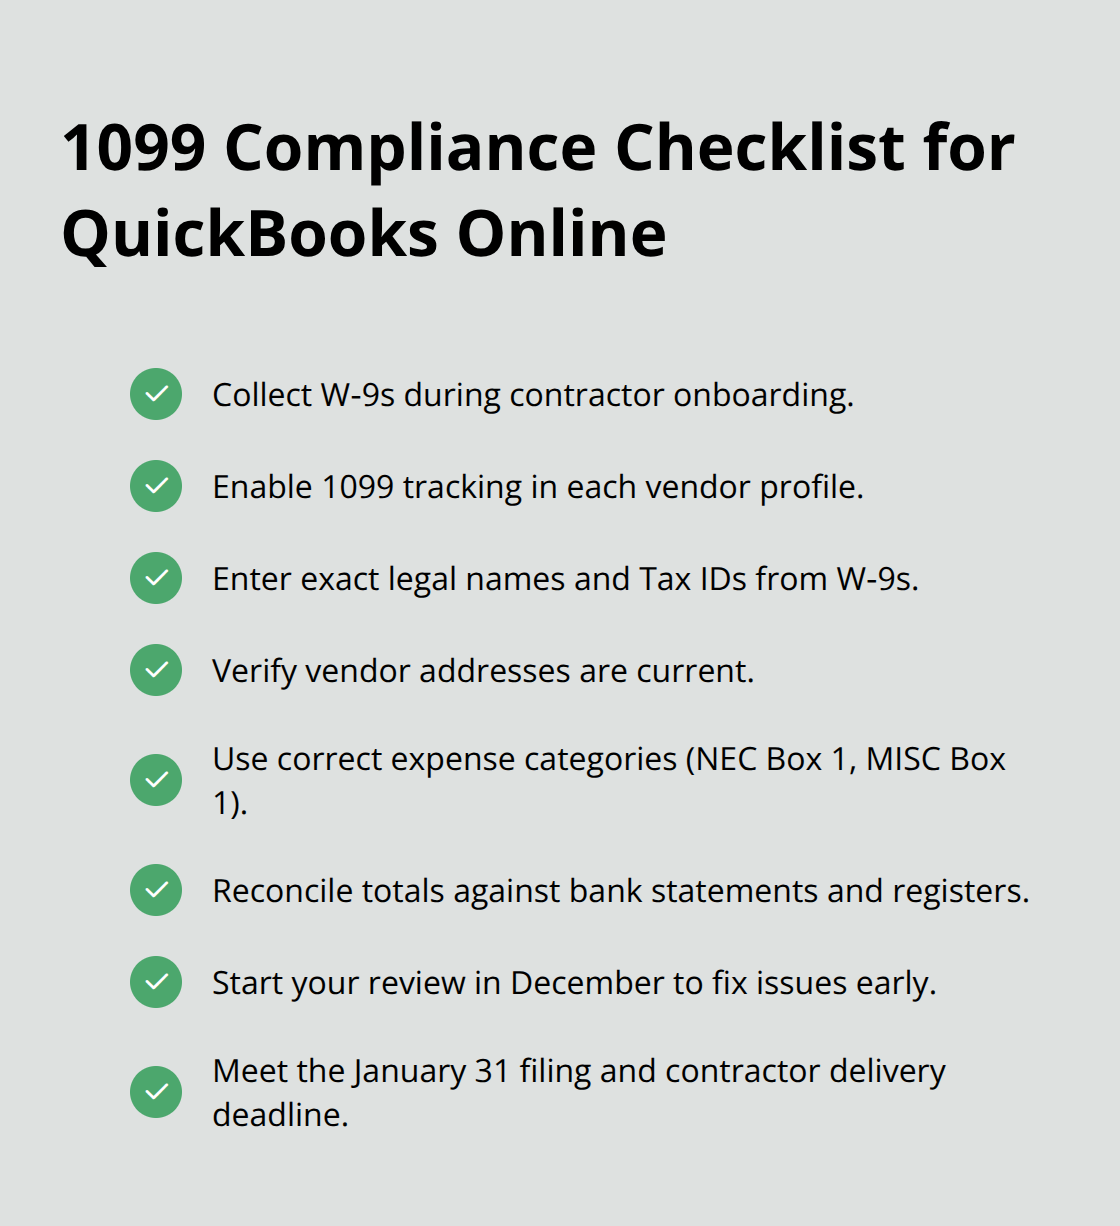
Successful 1099 management starts with proper vendor setup at the beginning of each tax year. Collect W-9 forms immediately when you onboard new contractors and enable 1099 tracking in their QuickBooks profiles. Categorize payments correctly throughout the year since reclassification later creates unnecessary work and increases error risks.
The biggest mistake businesses make is waiting until January to review their 1099 data. Missing Tax IDs, incorrect addresses, and payment misclassifications cause filing delays that trigger IRS penalties (starting at $50 per form). Start your review process in December to address vendor information gaps before deadlines approach.
QuickBooks Online generate 1099 capabilities streamline the entire process when you maintain accurate records year-round. Electronic filing saves time and reduces costs compared to paper submissions, while automated calculations minimize human errors that cause compliance issues. We at Optimum Results Business Solutions provide expert QuickBooks support to help businesses maintain compliance while they focus on growth.


